User Tasks
Ce contenu n’est pas encore disponible dans votre langue.
Translate in CrowdinThe Tasks is one of the essential tools for managing the localization process in Crowdin Enterprise. As a contributor (translator or proofreader), you can view and manage your assigned tasks, track progress, access content assigned within the task, and communicate with project managers or other contributors.
To stay informed about new task notifications and the latest task updates, enable the Task event type in your account’s Notifications settings.
You’ll receive notifications about any updates or changes to your tasks. These might include:
- A task being assigned to you.
- A task deleted.
- Changes to task details like due dates, content, or status.
- Mentions and comments related to the task.
There are four channels through which you can receive notifications. You can enable the ones that work best for you and disable unnecessary ones.
Read more about Notifications.
You can view, filter, and manage tasks assigned to you, allowing for efficient tracking and completion of your work in Crowdin Enterprise.
Searching, Filtering, and Sorting Assigned Tasks
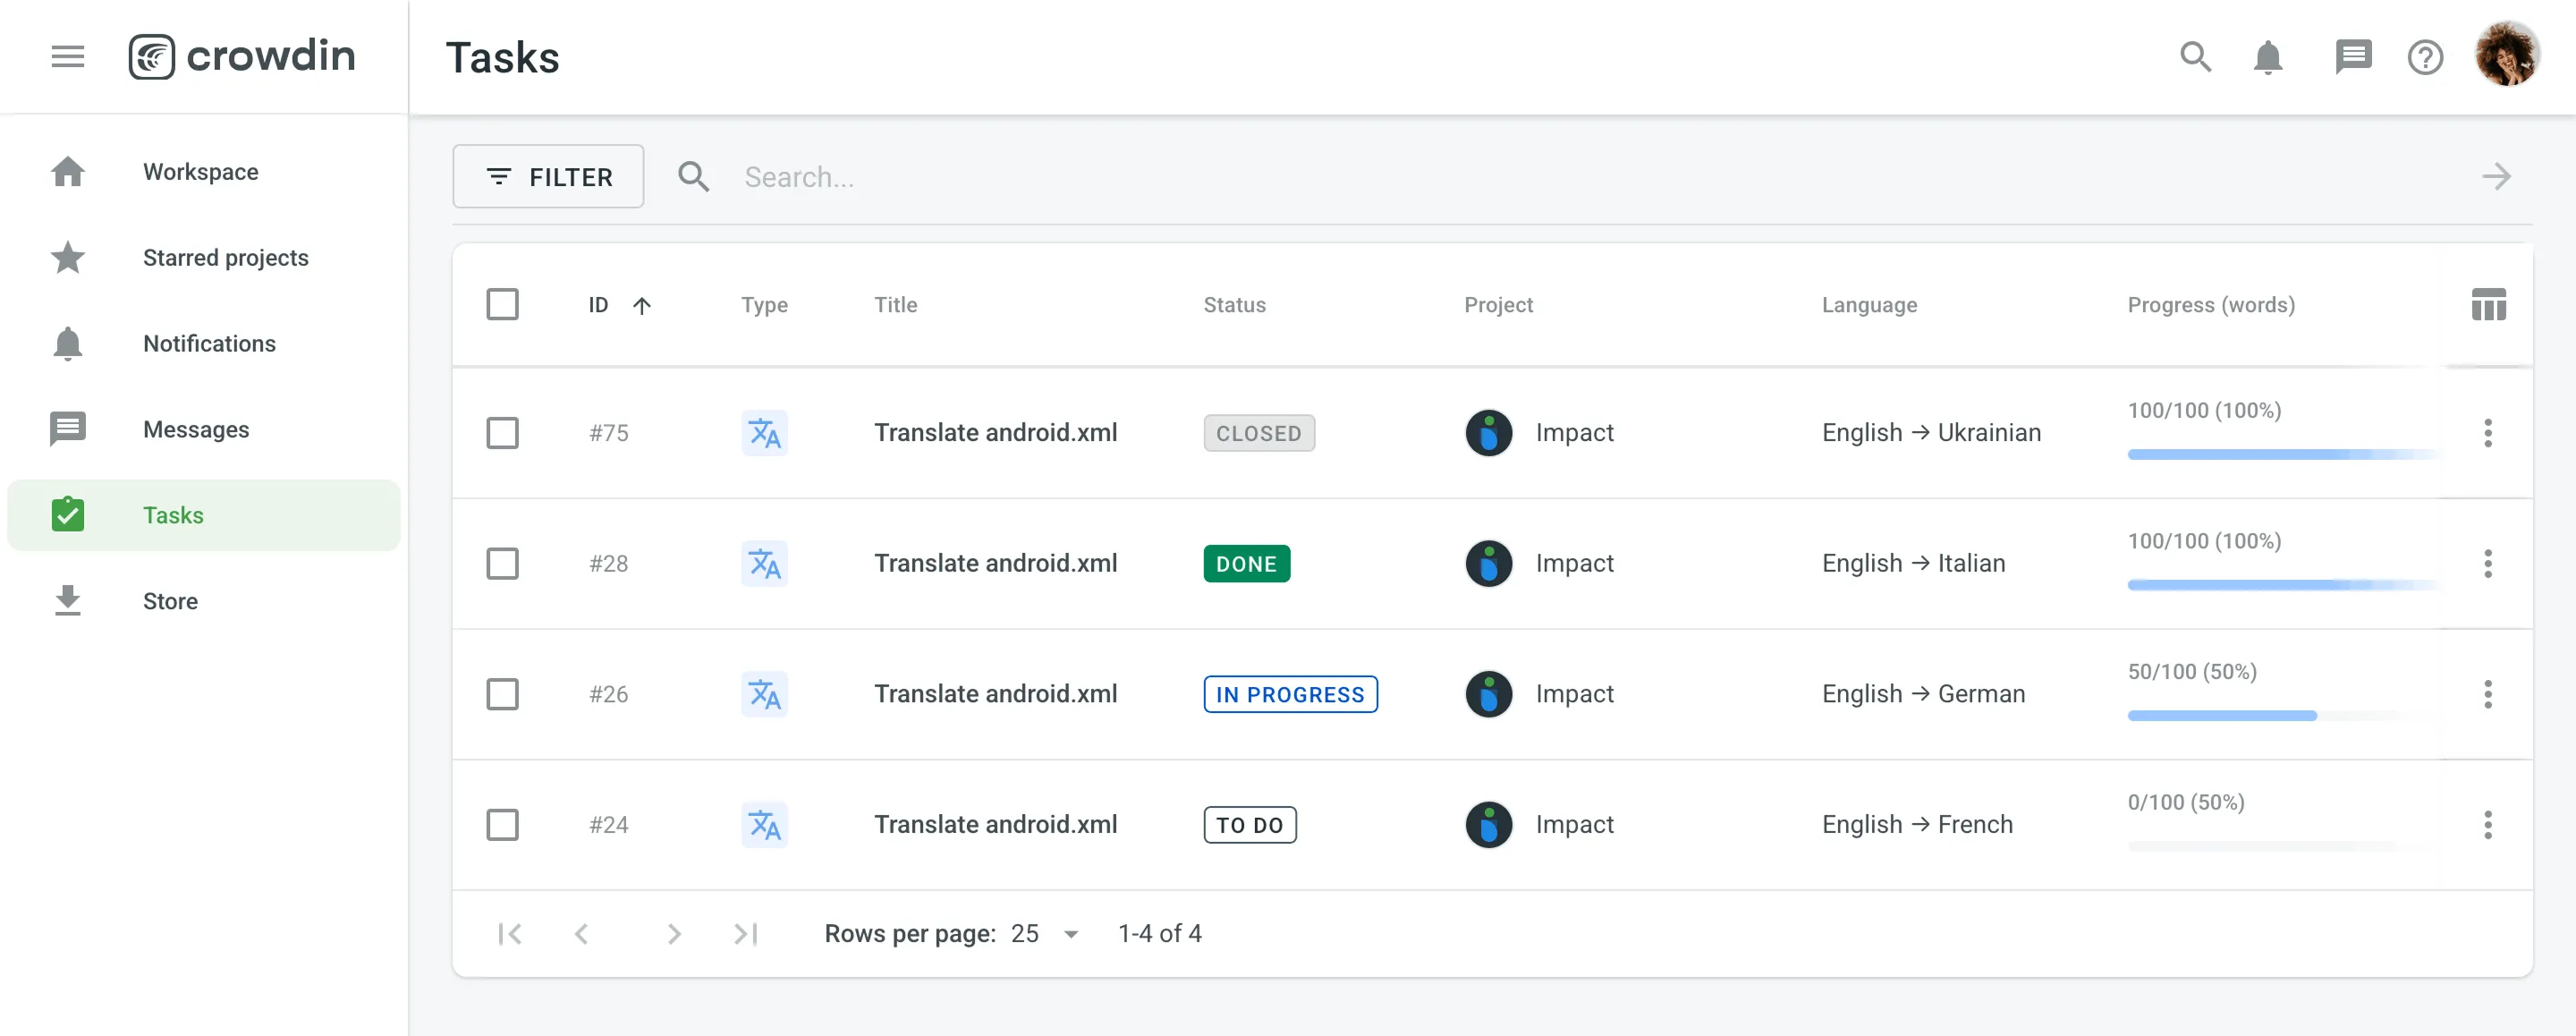
Section titled “Searching, Filtering, and Sorting Assigned Tasks”To view and filter all tasks assigned to you, go to your Workspace and select Tasks on the left sidebar.
On the Tasks page, tasks are displayed in a table with the following columns:
- ID – the unique identifier for the task.
- Type – indicates whether the task is for translation () or proofreading ().
- Title – the title of the task. Click a task title to open the task details.
- Status – the current status of the task.
- Project – the project in which the task is created. Click a project name to open the project.
- Language – the source-to-target language pair for the task.
- Progress (words) – the number of words left to be translated or proofread.
- Created by – the user who created the task. Click a user name to open a profile pop-up with their name, username, local time, Direct messages, and Invite to projects.
- Created – when the task was created.
- Due date – the deadline for task completion, if specified by the project manager.
- Start date – when the task was moved to In Progress, Done, or Closed.
- Resolved date – when the task was moved to Done or Closed. If a task is moved to Done and then later to Closed, the resolved date stays unchanged.
Tasks are sorted by ID in descending order by default (newer tasks first). Click the ID column header to switch to ascending order (older tasks first); click it again to switch back.
To filter tasks, click Filter and use the available options:
- Projects: All, selected projects, or groups.
- Type: All, Translate by own translators, Proofread by own proofreaders, Translate by vendor, Proofread by vendor.
- Source language: All or a selected source language.
- Target language: All or a selected target language.
- Assignee: All, Assigned to me, or a specific user.
- Created by: All, By me, or a specific user.
- Due date: Any date, Overdue now, Custom range.
- Created: Any date, Custom range.
- Start date: Any date, Custom range.
- Resolved date: Any date, Custom range.
- Status: All, To Do, In Progress, Done, Closed, Pending, For Approval.
To search for a particular task, enter its ID or title keywords in the Search field.
To reset all selected filters to default values, click Clear.
To manage a specific task from the list, click (or right-click) on the needed task to open the context menu. Depending on task status and your permissions, the menu can include View task, Open in Editor, Move to (with Move to To Do, Move to In Progress, and Move to Done, shown based on the current task status), Close, Edit, and Delete. For closed tasks, Move to is not shown and Close is replaced with Reopen.
The upper-right toolbar helps you manage selected tasks:
- Move to – changes status to To Do, In Progress, Done, or Closed. Select the target status and click Apply.
- Delete – removes selected tasks after confirmation.
Both buttons are disabled until at least one task is selected.
Before starting your work on a task, you can review task details to understand its scope.
To view task details, follow these steps:
- Go to your Workspace and select Tasks on the left sidebar.
- Open task details by clicking its title or opening the context menu and selecting View task.
The task opens directly within the project it’s associated with. Alternatively, you can access your assigned tasks by navigating to the specific project’s Tasks section and selecting yourself using the Assignee filter parameter.
In addition to the details available when viewing all of your assigned tasks, you will also see these details:
- Created by – the user who created the task.
- Created – when the task was created.
- Started date – when the task moved to In Progress, Done, or Closed.
- Resolved date – when the task moved to Done or Closed.
- Files – files associated with the task.
- Members – a list of assignees and the time each has spent on the task.
If you prefer to work offline, click in the upper-right corner and select Export as XLIFF. When you are finished translating, use Upload XLIFF translations to upload your translations.
Once you’re ready to start working on a task:
- Click on the task to open it.
- Review the strings or files assigned to you.
- Click Open in Editor to start translating or proofreading as needed.
As you work on the task, change its status from To Do to In Progress. Once your work is complete, update the status to Done.
If you encounter issues or need assistance with your assigned task, leave a comment in the Comments section for project managers or other contributors to see and respond.
As a contributor, you can log the time you spend on a task directly in the task comments. This logged time is used for generating the Time Spent report, which helps project managers calculate the cost of work based on hourly rates. You can also generate your own Time Spent report to track your contributions for tasks you’ve been assigned.
To log your time, follow these steps:
- Open the task you are working on and go to the Comments section.
- Click and enter the time you spent using a format like
1h 15m 15s. - (Optional) Add a text comment to your log entry.
- Click Send.
If a large task needs to be divided among multiple contributors, your project manager may split the content. You’ll receive only a portion of the task to work on. Focus on completing your assigned section and mark it as done when finished.
In some cases, tasks may be part of a sequence where one needs to be completed before the next can begin. For example:
- You may complete a translation task, after which a proofreading task becomes available.
- If you’re assigned a proofreading task linked to a translation task, it will remain pending until the translation is finished.
Sequential tasks help streamline the process, ensuring that each step is completed in the correct order.
Read more about Sequential Tasks.
How do I know when a task is due?
The task due date (if specified by the project manager) is displayed on the task in your Tasks section and its details section. You can also filter tasks by the due date in your Tasks section to prioritize your work.
What should I do if I finish a task early?
Mark the task as Done in your task list. If the task is part of a sequence, this will trigger the next task (e.g., proofreading) to begin.